Scheduler
Input Parameters for the Cluster
These parameters is located in input/omnia_config.yml
Parameter Name |
Default Value |
Additional Information |
|---|---|---|
mariadb_password |
password |
Password used to access the Slurm database.Required Length: 8 characters. The password must not contain -,, ‘,” |
k8s_version |
1.19.3 |
Kubernetes VersionAccepted Values: “1.16.7” or “1.19.3” |
k8s_cni |
calico |
CNI type used by Kubernetes.Accepted values: calico, flannel |
k8s_pod_network_cidr |
10.244.0.0/16 |
Kubernetes pod network CIDR |
docker_username |
Username to login to Docker. A kubernetes secret will be created and patched to the service account in default namespace.This value is optional but suggested to avoid docker pull limit issues |
|
docker_password |
Password to login to DockerThis value is mandatory if a docker_username is provided |
|
ansible_config_file_path |
/etc/ansible |
Path where the ansible.cfg file can be found.If dnf is used, the default value is valid. If pip is used, the variable must be set manually |
login_node_required |
true |
Boolean indicating whether the login node is required or not |
ldap_required |
false |
Boolean indicating whether ldap client is required or not |
ldap_server_ip |
LDAP server IP. Required if |
|
ldap_connection_type |
TLS |
For a TLS connection, provide a valid certification path. For an SSL connection, ensure port 636 is open. |
ldap_ca_cert_path |
/etc/openldap/certs/omnialdap.pem |
This variable accepts Server Certificate Path. Make sure certificate is present in the path provided. The certificate should have .pem or .crt extension. This variable is mandatory if connection type is TLS. |
user_home_dir |
/home |
This variable accepts the user home directory path for ldap configuration. If nfs mount is created for user home, make sure you provide the LDAP users mount home directory path. |
ldap_bind_username |
admin |
If LDAP server is configured with bind dn then bind dn user to be provided. If this value is not provided (when bind is configured in server) then ldap authentication fails. |
ldap_bind_password |
If LDAP server is configured with bind dn then bind dn password to be provided. If this value is not provided (when bind is configured in server) then ldap authentication fails. |
|
domain_name |
omnia.test |
Sets the intended domain name |
realm_name |
OMNIA.TEST |
Sets the intended realm name |
directory_manager_password |
Password authenticating admin level access to the Directory for system management tasks. It will be added to the instance of directory server created for IPA.Required Length: 8 characters. The password must not contain -,, ‘,” |
|
kerberos_admin_password |
“admin” user password for the IPA server on RockyOS. |
|
enable_secure_login_node |
false |
Boolean value deciding whether security features are enabled on the Login Node. |
powervault_ip |
IP of the powervault connected to the NFS server. Mandatory field when nfs_node group is defined with an IP and omnia is required to configure nfs server. |
Note
When ldap_required is true, login_node_required and freeipa_required have to be false.
Before You Build Clusters
Verify that all inventory files are updated.
If the target cluster requires more than 10 kubernetes nodes, use a docker enterprise account to avoid docker pull limits.
Verify that all nodes are assigned a group. Use the inventory as a reference.
The manager group should have exactly 1 manager node.
The compute group should have at least 1 node.
The login_node group is optional. If present, it should have exactly 1 node.
Users should also ensure that all repos are available on the target nodes running RHEL.
Note
The inventory file accepts both IPs and FQDNs as long as they can be resolved by DNS.
For RedHat clusters, ensure that RedHat subscription is enabled on all target nodes.
Features enabled by omnia.yml
Slurm: Once all the required parameters in omnia_config.yml are filled in,
omnia.ymlcan be used to set up slurm.LDAP client support: The manager and compute nodes will have LDAP installed but the login node will be excluded.
FreeIPA support
Login Node (Additionally secure login node)
Kubernetes: Once all the required parameters in omnia_config.yml are filled in,
omnia.ymlcan be used to set up kubernetes.BeeGFS bolt on installation
NFS bolt on support
Building Clusters
In the
input/omnia_config.ymlfile, provide the required details.
Note
Without the login node, Slurm jobs can be scheduled only through the manager node.
Create an inventory file in the omnia folder. Add login node IP address under the manager node IP address under the [manager] group, compute node IP addresses under the [compute] group, and Login node IP under the [login_node] group,. Check out the sample inventory for more information.
Note
Omnia checks for red hat subscription being enabled on RedHat nodes as a pre-requisite. Not having Red Hat subscription enabled on the manager node will cause
omnia.ymlto fail. If compute nodes do not have Red Hat subscription enabled,omnia.ymlwill skip the node entirely.Omnia creates a log file which is available at:
/var/log/omnia.log.If only Slurm is being installed on the cluster, docker credentials are not required.
To run
omnia.yml:
ansible-playbook omnia.yml -i inventory
Note
To visualize the cluster (Slurm/Kubernetes) metrics on Grafana (On the control plane) during the run of omnia.yml, add the parameters grafana_username and grafana_password (That is ansible-playbook omnia.yml -i inventory -e grafana_username="" -e grafana_password=""). Alternatively, Grafana is not installed by omnia.yml if it’s not available on the Control Plane.
Using Skip Tags
Using skip tags, the scheduler running on the cluster can be set to Slurm or Kubernetes while running the omnia.yml playbook. This choice can be made depending on the expected HPC/AI workloads.
Kubernetes:
ansible-playbook omnia.yml -i inventory --skip-tags "kubernetes"(To set Slurm as the scheduler)Slurm:
ansible-playbook omnia.yml -i inventory --skip-tags "slurm"(To set Kubernetes as the scheduler)
Note
If you want to view or edit the
omnia_config.ymlfile, run the following command:ansible-vault view omnia_config.yml --vault-password-file .omnia_vault_key– To view the file.ansible-vault edit omnia_config.yml --vault-password-file .omnia_vault_key– To edit the file.
It is suggested that you use the ansible-vault view or edit commands and that you do not use the ansible-vault decrypt or encrypt commands. If you have used the ansible-vault decrypt or encrypt commands, provide 644 permission to
omnia_config.yml.
Kubernetes Roles
As part of setting up Kubernetes roles, omnia.yml handles the following tasks on the manager and compute nodes:
Docker is installed.
Kubernetes is installed.
Helm package manager is installed.
All required services are started (Such as kubelet).
Different operators are configured via Helm.
Prometheus is installed.
Slurm Roles
As part of setting up Slurm roles, omnia.yml handles the following tasks on the manager and compute nodes:
Slurm is installed.
All required services are started (Such as slurmd, slurmctld, slurmdbd).
Prometheus is installed to visualize slurm metrics.
Lua and Lmod are installed as slurm modules.
Slurm restd is set up.
Login node
If a login node is available and mentioned in the inventory file, the following tasks are executed:
Slurmd is installed.
All required configurations are made to
slurm.conffile to enable a slurm login node.FreeIPA (the default authentication system on the login node) is installed to provide centralized authentication
- Hostname requirements
In the
examplesfolder, a mapping_host_file.csv template is provided which can be used for DHCP configuration. The header in the template file must not be deleted before saving the file. It is recommended to provide this optional file as it allows IP assignments provided by Omnia to be persistent across control plane reboots.The Hostname should not contain the following characters: , (comma), . (period) or _ (underscore). However, the domain name is allowed commas and periods.
The Hostname cannot start or end with a hyphen (-).
No upper case characters are allowed in the hostname.
The hostname cannot start with a number.
The hostname and the domain name (that is:
hostname00000x.domain.xxx) cumulatively cannot exceed 64 characters. For example, if thenode_nameprovided ininput/provision_config.ymlis ‘node’, and thedomain_nameprovided is ‘omnia.test’, Omnia will set the hostname of a target compute node to ‘node00001.omnia.test’. Omnia appends 6 digits to the hostname to individually name each target node.
Note
To enable the login node, ensure that
login_node_requiredininput/omnia_config.ymlis set to true.To enable security features on the login node, ensure that
enable_secure_login_nodeininput/omnia_config.ymlis set to true.To customize the security features on the login node, fill out the parameters in
input/omnia_security_config.yml.
Warning
No users/groups will be created by Omnia.
Slurm job based user access
To ensure security while running jobs on the cluster, users can be assigned permissions to access compute nodes only while their jobs are running. To enable the feature:
cd scheduler
ansible-playbook job_based_user_access.yml -i inventory
Note
The inventory queried in the above command is to be created by the user prior to running
omnia.ymlasscheduler.ymlis invoked byomnia.ymlOnly users added to the ‘slurm’ group can execute slurm jobs. To add users to the group, use the command:
usermod -a -G slurm <username>.
Installing LDAP Client
Manager and compute nodes will have LDAP client installed and configured if ldap_required is set to true. The login node does not have LDAP client installed.
Warning
No users/groups will be created by Omnia.
FreeIPA installation on the NFS node
IPA services are used to provide account management and centralized authentication. To set up IPA services for the NFS node in the target cluster, run the following command from the utils/cluster folder on the control plane:
cd utils/cluster
ansible-playbook install_ipa_client.yml -i inventory -e kerberos_admin_password="" -e ipa_server_hostname="" -e domain_name="" -e ipa_server_ipadress=""
Input Parameter |
Definition |
Variable value |
|---|---|---|
kerberos_admin_password |
“admin” user password for the IPA server on RockyOS and RedHat. |
The password can be found in the file |
ipa_server_hostname |
The hostname of the IPA server |
The hostname can be found on the manager node. |
domain_name |
Domain name |
The domain name can be found in the file |
ipa_server_ipadress |
The IP address of the IPA server |
The IP address can be found on the IPA server on the manager node using the |
Use the format specified under NFS inventory in the Sample Files for inventory.
BeeGFS Bolt On
BeeGFS is a hardware-independent POSIX parallel file system (a.k.a. Software-defined Parallel Storage) developed with a strong focus on performance and designed for ease of use, simple installation, and management.
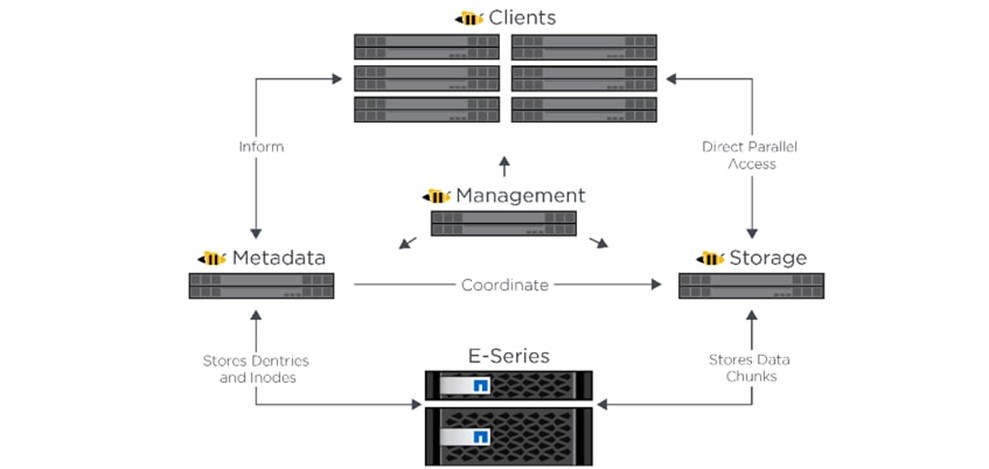
Pre Requisites before installing BeeGFS client
If the user intends to use BeeGFS, ensure that a BeeGFS cluster has been set up with beegfs-mgmtd, beegfs-meta, beegfs-storage services running.
Ensure that the following ports are open for TCP and UDP connectivity:
Port
Service
8008
Management service (beegfs-mgmtd)
8003
Storage service (beegfs-storage)
8004
Client service (beegfs-client)
8005
Metadata service (beegfs-meta)
8006
Helper service (beegfs-helperd)
To open the ports required, use the following steps:
firewall-cmd --permanent --zone=public --add-port=<port number>/tcp
firewall-cmd --permanent --zone=public --add-port=<port number>/udp
firewall-cmd --reload
systemctl status firewalld
Ensure that the nodes in the inventory have been assigned only these roles: manager and compute.
Note
If the BeeGFS server (MGMTD, Meta, or storage) is running BeeGFS version 7.3.1 or higher, the security feature on the server should be disabled. Change the value of
connDisableAuthenticationtotruein /etc/beegfs/beegfs-mgmtd.conf, /etc/beegfs/beegfs-meta.conf and /etc/beegfs/beegfs-storage.conf. Restart the services to complete the task:systemctl restart beegfs-mgmtd systemctl restart beegfs-meta systemctl restart beegfs-storage systemctl status beegfs-mgmtd systemctl status beegfs-meta systemctl status beegfs-storage
Note
BeeGFS with OFED capability is only supported on RHEL 8.3 and above due to limitations on BeeGFS. When setting up your cluster with RDMA support, check the BeeGFS documentation to provide appropriate values in input/storage_config.yml.
If the cluster runs Rocky, ensure that versions running are compatible:
Rocky OS version |
BeeGFS version |
|---|---|
Rocky Linux 8.4: no OFED, OFED 5.3, 5.4 |
7.3.2 |
Rocky Linux 8.5: no OFED, OFED 5.5 |
7.3.2 |
Rocky Linux 8.6: no OFED, OFED 5.6 |
7.3.2 |
Rocky Linux 8.4: no OFED, OFED 5.3, 5.4 |
7.3.1 |
Rocky Linux 8.5: no OFED, OFED 5.5 |
7.3.1 |
Rocky Linux 8.6: no OFED, OFED 5.6 |
7.3.1 |
Rocky Linux 8.4: no OFED, OFED 5.3, 5.4 |
7.3.0 |
Rocky Linux 8.5: no OFED, OFED 5.5 |
7.3.0 |
Rocky Linux 8.4: no OFED, OFED 5.3, 5.4 |
7.2.8 |
Rocky Linux 8.5: no OFED, OFED 5.5 |
7.2.8 |
Rocky Linux 8.6: no OFED, OFED 5.6 |
7.2.8 |
Rocky Linux 8.4: no OFED, OFED 5.3, 5.4 |
7.2.7 |
Rocky Linux 8.5: no OFED, OFED 5.5 |
7.2.7 |
Rocky Linux 8.6: no OFED, OFED 5.6 |
7.2.7 |
Rocky Linux 8.5: no OFED, OFED 5.5 |
7.2.6 |
Rocky Linux 8.6: no OFED, OFED 5.6 |
7.2.6 |
Rocky Linux 8.4: no OFED, OFED 5.3, 5.4 |
7.2.5 |
Rocky Linux 8.4: no OFED, OFED 5.3, 5.4 |
7.2.4 |
Installing the BeeGFS client via Omnia
After the required parameters are filled in input/storage_config.yml, Omnia installs BeeGFS on manager and compute nodes while executing the omnia.yml playbook.
.. note::
BeeGFS client-server communication can take place through TCP or RDMA. If RDMA support is required, set
beegfs_rdma_supportshould be set to true. Also, OFED should be installed on all target nodes.For BeeGFS communication happening over RDMA, the
beegfs_mgmt_servershould be provided with the Infiniband IP of the management server.
NFS Bolt On
Ensure that an external NFS server is running. NFS clients are mounted using the external NFS server’s IP.
Fill out the
nfs_client_paramsvariable in theinput/storage_config.ymlfile in JSON format using the samples provided below.This role runs on manager, compute and login nodes.
Make sure that
/etc/exportson the NFS server is populated with the same paths listed asserver_share_pathin thenfs_client_paramsininput/storage_config.yml.Post configuration, enable the following services (using this command:
firewall-cmd --permanent --add-service=<service name>) and then reload the firewall (using this command:firewall-cmd --reload).nfs
rpc-bind
mountd
Omnia supports all NFS mount options. Without user input, the default mount options are nosuid,rw,sync,hard,intr. For a list of mount options, click here.
The fields listed in
nfs_client_paramsare:server_ip: IP of NFS server
server_share_path: Folder on which NFS server mounted
client_share_path: Target directory for the NFS mount on the client. If left empty, respective
server_share_path valuewill be taken forclient_share_path.client_mount_options: The mount options when mounting the NFS export on the client. Default value: nosuid,rw,sync,hard,intr.
There are 3 ways to configure the feature:
Single NFS node : A single NFS filesystem is mounted from a single NFS server. The value of
nfs_client_paramswould be:- { server_ip: 172.10.0.101, server_share_path: "/mnt/share", client_share_path: "/mnt/client", client_mount_options: "nosuid,rw,sync,hard,intr" }
Multiple Mount NFS Filesystem: Multiple filesystems are mounted from a single NFS server. The value of
nfs_client_paramswould be:- { server_ip: 172.10.0.101, server_share_path: "/mnt/share1", client_share_path: "/mnt/client1", client_mount_options: "nosuid,rw,sync,hard,intr" } - { server_ip: 172.10.0.101, server_share_path: "/mnt/share2", client_share_path: "/mnt/client2", client_mount_options: "nosuid,rw,sync,hard,intr" }
Multiple NFS Filesystems: Multiple filesystems are mounted from multiple NFS servers. The value of
nfs_client_paramswould be:- { server_ip: 172.10.0.101, server_share_path: "/mnt/server1", client_share_path: "/mnt/client1", client_mount_options: "nosuid,rw,sync,hard,intr" } - { server_ip: 172.10.0.102, server_share_path: "/mnt/server2", client_share_path: "/mnt/client2", client_mount_options: "nosuid,rw,sync,hard,intr" } - { server_ip: 172.10.0.103, server_share_path: "/mnt/server3", client_share_path: "/mnt/client3", client_mount_options: "nosuid,rw,sync,hard,intr" }
Warning
After an NFS client is configured, if the NFS server is rebooted, the client may not be able to reach the server. In those cases, restart the NFS services on the server using the below command:
systemctl disable nfs-server
systemctl enable nfs-server
systemctl restart nfs-server